Tips
We are excited to share our tips. Periodically we will be adding more, so be sure to stop by again!
Some quilting cottons bleed--lose their dyes when washed--especially fabrics with vivid colors like red and purple. The dyes can stain other fabrics in your washload or patches in a finished quilt. Perform this easy bleed test on any cotton fabrics you suspect might bleed. Perform the Bleed Test 1. Submerge a small piece of a fabric in soapy water--a 2-inch square is fine. Use the same soap and water temperature you normally use to wash fabrics and quilts. 2. Let the fabric sit in the soapy solution for about 30 minutes, then check to see if the water is discolored. If it is, the fabric bleeds and the dyes could potentially damage other fabrics. 3. If the water is clear, try one more thing to make sure the dyes won't transfer onto adjacent fabrics when wet. Remove the patch and, without rinsing, place it on a white paper towel. Wait a bit and check to see if dye has transferred onto the toweling. If it did, chances are good that it will transfer dye onto adjacent patches when your quilt is washed. 4. Rinse out the soap and dry your test patch, then perform the bleed test again. If bleeding continues, do not use the fabric in your quilts.If you can't bear not to use a fabric that bleeds or transfers, purchase a commercial dye fixative, such as Retayne, to help make the dyes more permanent. Treat a snip of fabric, following the instructions carefully, then try the bleed test again.Most fabrics produced by companies that cater to quilters do not bleed, but it's a good idea to do a bleed test on all vivid fabrics until you have a good understanding of which fabrics you can trust.
Recycle those Beanie Babies!
Remember the "Beanie Baby craze about 10 years ago?" How could you forget? Those little critters were everywhere you looked! Well, more than likely, you or your children or grandchildren have some old Beanies in need of some new lovin'. Why not give those little critters a new purpose in life and use them as pin cushions? They work great and they're so cute! Keep one by your sewing machine, one by your favorite quilting chair and definitely one by your cutting table. Fill 'em full of pins....they won't mind....in fact, they'll love being loved all over again :)
Are you unsure which is the lengthwise and the crosswise grain of the fabric?
The way to tell is to let the fabric SING to you.Here's how:
Place one edge of the fabric in each hand with some slack in the fabric.
Pull the fabric taught
It will make a sound.
Listen to the pitch of that sound
Now repeat in the other direction
You will notice a difference in the pitch of the sound
The HIGHER Pitch is the lengthwise grain
The LOWER Pitch is the crosswise grain.
Patsy Shields from Sulky of America
Applying Borders
After the body of the quilt has been pieced, gently press before adding borders.
The logical place to measure the finished top is along its outside edges, and this is a useful measurement. However, measurements should be taken across the center in two or three places for both the width and length. If these measurements are different from that of the outer edge, accidental stretching has occurred. To keep the finished quilt as straight and square as possible, you must measure the centers.
To make a border with straight-cut corners:
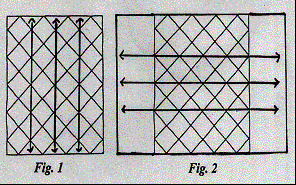
Determine the length of the quilt border by averaging the distance of two or three center measurements (see Fig. 1).
Cut two borders that length and pin them to opposite sides of the quilt matching ends and centers and easing in the fullness.
Sew and press.
Determine the width of the quilt border by averaging the distance of two or three center measurements (see Fig. 2).
Cut these borders that length and pin - easing in the fullness. Sew and press.
To make mitered corners, consult a quilting book that contains instructions for finishing a quilt.

Texas Wildflower from Michael Miller Fabrics
The Texas WildFlower fabric used our Texas Pattern can be found at:
Michael Miller Fabrics
Phone: 212-704-0774


